Let's go through how to install MODX on hosting. What basic settings to configure and what essential plugins to install for MODX. We're talking about a clean installation from scratch. Official documentation. The process is similar to WordPress.
Download MODX and Upload to Hosting
From the official website https://modx.com/download.
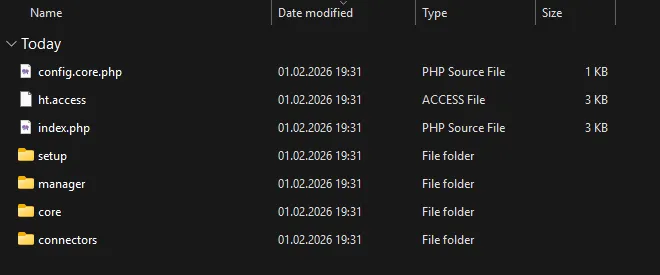
Next, you don't even need to extract the archive if your hosting control panel allows archive extraction (HestiaCP, ISPmanager, Beget), but upload it directly to hosting. You need the following files to end up in the ..your-domain.com/public_html folder:
- config.core.php
- ht.access
- index.php
- setup
- manager
- core
- connectors
I also recommend saving the zip archive with MODX itself one level up in ..your-domain.com/. This may be needed later when deploying from dev environment to prod or when changing domains.
Usually, right after creating a site in the hosting control panel, the ..your-domain.com/public_html folder is already created and may contain files:
- robots.txt - keep it. Used to create rules for robots, which directories to scan and which not, as well as to specify the sitemap path, manage crawl frequency, and ignore GET parameters.
- index.php or index.html - delete. Usually this is a placeholder page from the hosting provider or control panel.
- cgi-bin (folder) - delete. Empty folder for executing Perl, Python, or bash scripts. Those who need it will keep it.
- ...
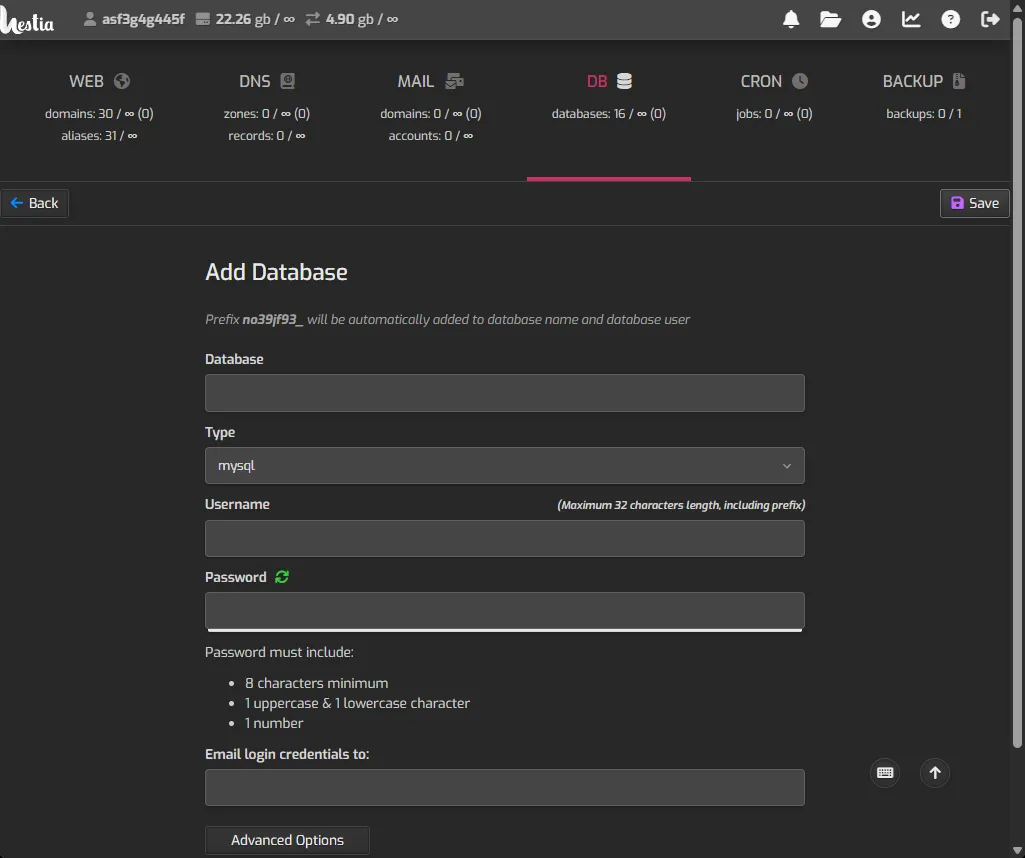
Create Database
In your hosting control panel, look for the database section and create a MySQL database. Write down:
- Database name
- Username
- Database password
- Server (usually localhost)
We'll need this data later when installing MODX. It can also be found in the configuration file at ..your-domain.com/public_html/core/config/config.inc.php.
Launch MODX Installation
If you're installing on hosting - I recommend making sure the host is accessible via https - the Let's Encrypt SSL certificate is already issued. For local installation, it's also desirable to use software that supports virtual hosts, not just localhost. Although this is a matter of personal preference.
Go to https://your-domain.com/setup and then select full installation, specify language and database credentials, admin credentials. At the end, the installer will suggest deleting the /setup directory - agree.
Then log into the admin panel at https://your-domain.com/manager and enter the credentials set during installation.
Close Site from Crawling During Development
If development is not happening locally but directly on the target domain - you need to immediately close the site from search engines. This is necessary so that during development, robots don't crawl the raw and unfinished site.
- The most reliable way to close a site from crawling is to set a password in htaccess and htpassword.
- Other methods are unreliable:
- Set 403 response code for all bots in htaccess by detecting "bot" in User-Agent
- Close site in robots.txt
- Set meta robots noindex tag on pages
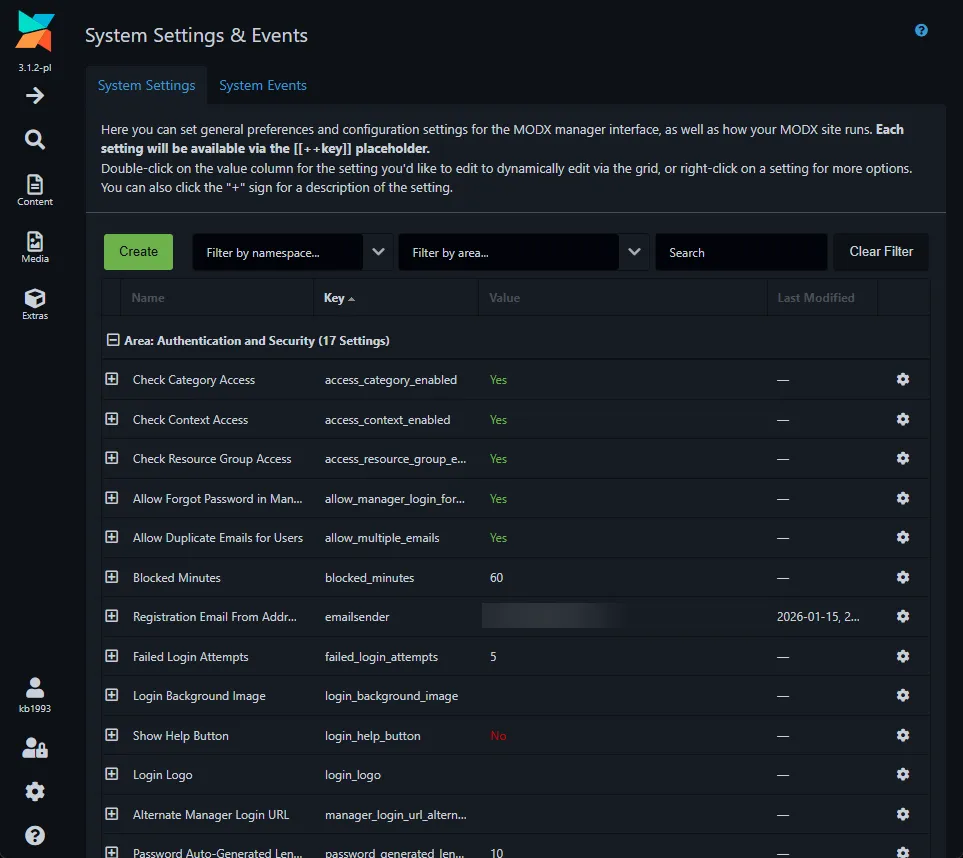
MODX System Settings
Activate Friendly URL's
In System Settings > Friendly URL, change settings:
- friendly_urls = Yes (Activates friendly URLs)
- use_alias_path = Yes (Activates nested folder structure)
- link_tag_scheme = 1 (so placeholders through always return links with https)
In Content Types Replace .html with / for HTML Documents
In Content > Content Types, change settings:
- HTML (File Extension) = / (To remove .html at the end)
Rename htaccess
After installation, the .htaccess file is renamed by default to ht.access so it doesn't affect links or routing. Rename the file in each of the three directories:
- /public_html
- /manager
- /core
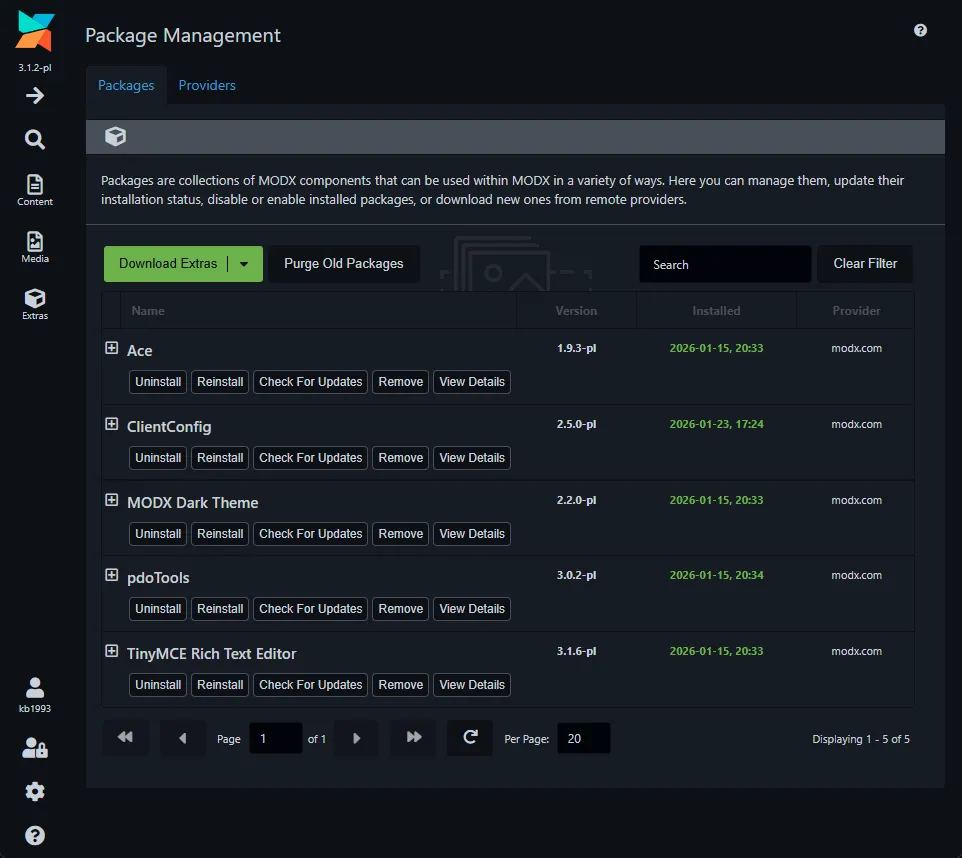
Install Plugins
Below is a minimal set of plugins that are in demand on most sites, regardless of type (blog, corporate site, online store...). Go to the Extras section, download and install immediately:
- TinyMCE Rich Text Editor (visual editor for content), and immediately change its settings in System Settings:
- Tinymcerte.relative_urls = No
- Tinymcerte.remove_script_host = Yes (if you want relative links starting with slash), No (if you want absolute)
- Dark theme (dark theme for MODX admin panel)
- Formit (form submission to email)
- pdoTools (custom fields, menu, sitemap, breadcrumbs)
- Ace (code editor) and immediately change theme in System Settings:
- ace.theme = ambiance
- MIGX (repeater fields)
- ClientConfig (custom system settings to connect logos, contacts and other things as variables in templates)
- ...
Create Categories
Categories allow grouping variables, chunks, snippets and plugins, so I usually create this set:
- Header
- Footer
- Content
- Core
- ... (further categories are created depending on site type)
Categories are created on the Elements tab.
Create Chunks
Similarly, here's a set of chunks in demand on every site:
- head, header (category = Header)
- footer, scripts (category = Footer)
- ...
Chunks are created on the Elements tab.
Create Folders Inside /assets
I usually create this folder structure inside /public_html/assets:
- img
- css
- js
Clear Cache
After completing all operations, don't forget to clear cache: Content > Clear Cache + Refresh URIs.
Conclusion
This is my checklist for clean MODX installation, use it for quick creation of a new site.